Are you planning a 2015 light pole banner project in the City of Boston? Just be forewarned, there are numerous details in planning a light pole banner project. Staggering, unbelievable but not overwhelming. The purpose of this blog is to help you plan a pole banner program from start to finish.
Pole Banner Sizes:

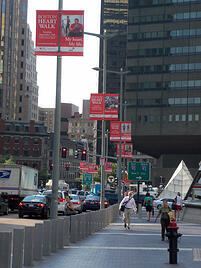
The city light poles come in two sizes. You guessed it. The poles are either large or small: Large poles can display a 30”w x 60”h double sided banner. One double sided banner on each side of the light pole. There is a city approved template showing this layout. Small poles can feature a 24”w x 48”h double sided banner. Again, one double sided banner on both sides of the pole. There is a template for the 24”w x 48”h banner illustrating this format.
*SIDE NOTE: Banners can’t interfere with city signage such as a Speed Limit sign, etc.
Now that you know the available banner sizes you’re ready to determine which size you want but prepare to use both sizes. The banner size will depend on whether large or small poles, or both, are in your preferred display area. Combining the two sizes is not uncommon. The next important bit of information is the light pole banner season. That’s right. Light pole banner programs have a season just like football, hockey, American Ninja or any sport. The light pole banner season is: March 15 – December 15. No light pole banners are allowed in the city during winter.
Determine Your Banner Graphics:
There are two initial steps to complete in order to get the project rolling. The first is to determine banner graphics.
- You will need to develop banner graphics using the City of Boston approved design format or template. If you don’t use the template the art work will not be approved. No art work approval…no light pole banner program.
- Normally, there are two graphic designs per light pole. The designs are visible on the front and back of the banners.
- Keep in mind that a pole banner design should not resemble a company or product ad.
Determine Number of Banners Needed:
The second step is to determine how many and which city light poles you want to use for your program. Obviously, the poles should be located in the vicinity of your event such as Boylston Street for a Hynes Convention Center program and it is always nice to have a map of the chosen light pole locations. The map makes it easier for City Hall to review your pole reservation request. Once the art work is finished and the pole locations are determined it is time to submit the information to City Hall. City Hall must review and approve the banner designs and light pole reservation request before the project can proceed.
* SIDE NOTE: The light poles may be on DCR or MWRA property which means they must approve art work and light pole reservation requests instead of City Hall…it was mentioned there are voluminous details.
Getting Approvals:
It is recommended that the art work and pole reservation be submitted together, say; 6 months in advance. However, this recommendation is more for the light pole reservation. The art work approval deadline is actually 60 – 90 days prior to banner installation. But, submitting the reservation and banner layout together is better. The city, DCR or MWRA also needs to know when the banners will be installed and removed. *Always remember, competition for City of Boston light poles is fierce, ferocious and monumental. Thesooner your information is submitted the better chance of executing your project. There are several events that take priority each year, such as; the Boston Marathon, Shakespeare on the Common, July 4th POPS and the Boston Ballet Nutcracker. The chances of getting city approval for a program that interferes with these events is impossible, slim and none, see you later, no-way, etc.
Budgeting Your Pole Banner Project:
Another important aspect of planning your program is the “Budget”. Here is a rough breakdown of what needs to be considered when compiling program cost:- Art Work & Hard Proofs
- Banner Printing & Finishing (need light pole quantity & banner sizes)
- Light Pole Bracket Rental (maybe)
- Freight (inbound materials)
- City Light Pole Rental Fee (paid directly to the City of Boston)
- Banner Installation / Takedown
- City Police Details (4 hr. min. / detail)
- City Permits (install / takedown)
- Utility Truck Rental (install / takedown)
City of Boston Light Pole Banner Timeline Example:
Do you think a production timeline example might be helpful? Thought you might. So, let’s create a program timeline based on an event scheduled for the Boston Convention & Exhibition Center (BCEC) Event Date: July 13 – 16, 2015. And, say the banner install and takedown dates are July 2 and July 17.
*SIDE NOTE: There are 31 large light poles on Summer Street where the BCEC is located. City of Boston Light Pole Banner Timeline.
1/5 – Artwork & light pole reservation submitted to City Hall
1/19 – Artwork & light pole reservations approved by City Hall
2/2 – Pole banner soft proof for review & approval
2/11 – Hard proof available for review & approval (optional)
5/4 – Banner printing starts
5/18 – Banners printed
5/27 – Banners finished (prints stitched back-to-back, pole sleeves, hem all around & grommets)
7/2 – Banners installed
7/13 – 16 / Event
7/17 – Banner takedown
If there appears to be some fluff built into the schedule…you’re right. The process doesn’t always go smoothly (no joke). Just remember the lead time for artwork and light pole approval is crucial. Also, remember that fluff in the production schedule is a good thing. Fluff helps maintain sanity.